DIY Haircut, The Frugal Way To Get A Layered Haircut Without Spending!
DIY Haircut
Have you been to a salon lately? The cost of getting a haircut is crazy! You can drop $20 to $30 bucks easy. Well, it is time for me to cut my hair again to send to Locks Of Love, so I thought I would show you how to do the DIY haircut. Since I started donating my hair I have been to a salon to have it cut one time. After the shock of the price, I now do a DIY haircut and I am going to show you how.
The first few times I cut my hair I just pulled it back into a loose ponytail and had my husband cut it just above the hair tie. That gave me a straight shoulder length cut. However, with this DIY haircut, I am going to show you how to do a layered cut. This will make my hair shoulder length but it will be shorter on the crown of my head.
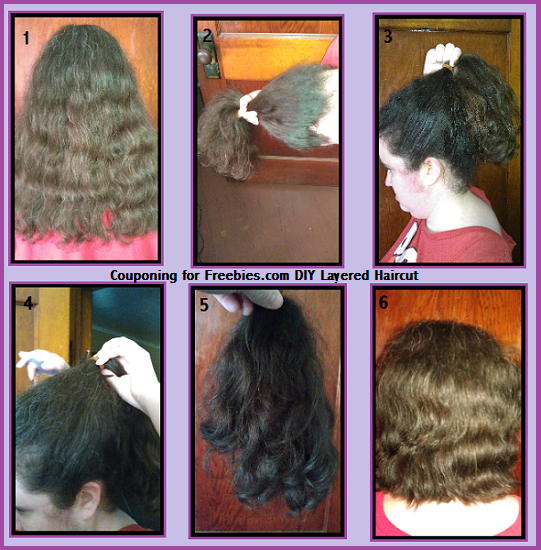
Step one: wash your hair and let it dry fully.
Step two: brush your hair thoroughly as to make sure there are no tangles. We want to make sure the hair gets cut evenly and if there is a tangle then some of the hair will end up short in the wrong places.
Step three: brush your hair into a loose ponytail with the hair tie in the back center of your head. When doing this don’t just gather your hair. You need to take the brush and brush from your forehead back so that it will be layered out right. I actually find it easier to bend over and brush it into a ponytail that way. Depending on the length you are going for will determine how tight you make the ponytail. I wanted the top of my head layers to be about 2-3 inches long, so I went with the looser ponytail.
Step four: The cut! Now just take scissors and cut just above the hair tie. This will give you your layered hair and a ponytail that you can send to Locks Of Love if you so choose. Just a quick note, if you are sending them your ponytail it needs to be at least 10 inches long. It is ok if it is layered as long as the longest point is 10 inches or more.
Step five: Brush or comb your hair again. Look for any extra long pieces and trim if needed. If you pulled into the ponytail right, you should have none to very little that need to be trimmed.
Easy right? Now just look at how much you can save by doing a DIY haircut! Even though my haircuts are only every few years (as that is how long it takes me to grow it for Locks of Love and it is the only time I will cut it) we save a lot because I also give my husband his haircuts. It’s just one of those frugal ways to save a few bucks!
I really encourage everyone to donate their hair. You can do it if you do a DIY haircut or if you have it cut at a salon. It is such a great way to help out others. Did you know that it takes six to ten ponytails to make one hairpiece? I have been donating mine for about 10 years now so I have sent five ponytails. That’s not even enough for one piece. That’s why I try to get others to do it too.